This past weekend I was over at Lauren’s house and while waiting for her to finish getting ready, I was looking through msconfig on her laptop (I’m an IT guy, sue me). One of the items I found that I’d never heard of before was Greenshot. I looked it up and asked her about it. She told me it was the most amazing screenshot application she’d ever used. I thought it was a bit silly since all you’re doing is taking screenshots, right? Well, I gave it a shot and color me impressed.
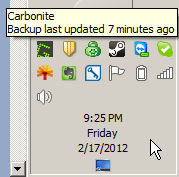
Greenshot is a small download and install. It sits in your tray and takes over the Print Screen (aka PrtScn/SysRq) button, very simple. Since Windows Vista/7, I’d always used the snipping tool and was curious as to what Lauren had seen in Greenshot. I found out the first time I used it; when you press Print Screen, it freezes the screen and allows you to select exactly what you want (or you can capture just the active window or full screen with Alt or Ctrl, respectively, and Print Screen). The screenshot to the left here is the quick demo as to why this feature is so powerful.

It captures EXACTLY what is on screen at that moment, including any popups, notifications or alt text. This is something that has always bugged me about Windows snipping tool that I had to work around. Certain popups (especially in browser menu items) disappear when you mouse away to activate the snipping tool. With Greenshot, it is no longer a problem — no work around necessary (other than using Greenshot).
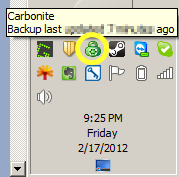
The second piece of functionality in Greenshot that totally sold me on the app, was the post-capture image editor. This built in image editor has a small set of features that serves almost any screenshot modification need. Windows Snipping Tool lets you draw and highlight, that’s it. Greenshot has Rectangle, Eclipse, Line, Arrow, Textbox, Highlight… and my favorite… Obfuscate. This last feature made me stupidly excited.
Just the other day I was doing some spec design for PDNSOps and wanted to post a screenshot of other DNS interfaces. The first shot I posted was from DNSMadeEasy (a wonderful service) and required me save the image from Snipping Tool and then load it up in Paint.NET to erase the IP addresses. It doesn’t take long but if you’ve got a number of screenshots to fix up (e.g. Here’s the 10 step process on how to do X with your domain name), it takes up more time than it should. I created the same screen shot with Greenshot in a matter of seconds, using the built-in obfuscation.
The other features of the image editor are all surprisingly powerful. All of the shapes are done as objects (a la Photoshop) rather than directly onto the screenshot canvas. That means you can come back later and modify the shapes (make them bigger, smaller, change colors, thicker lines, etc). You can even move/remove the mouse cursor. This is great for the example Carbonite screenshots I posted above. I had to mouse over the Carbonite icon to get the alt-text, but I don’t want the cursor in the way of the users identifying the icon on their own machines.
You can see more shots of Greenshot in action but really you should just download it and give it a spin. I’m oddly excited by something so simple as a screenshot application, but if you’re like me (an IT person) you probably take a LOT of screenshots. Greenshot just makes the entire process so much faster and easier.