At the office we use Datadog for monitoring our production systems, so when I spun up a test Kubernetes cluster (running Tectonic) I wanted to monitor using the same tool. Unfortunately the initial deploy of the Datadog agent didn’t work quite as well I was hoping. While I used their stock Kubernetes YAML as prescribed by the knowledgebase, it did not cover monitoring the Master nodes. Datadog support suggested I go another route (or host on docker based monitoring) which would have worked — but wasn’t as slick as I hoped. Fortunately just a few days ago I discovered the solution: Taints and Tolerances.
For those who don’t know, Kubernetes 1.6 (being just a few months old now) introduced a number of new features, most notably (to our use case) Taints and Tolerances. It has been explained at length in the official blog post “Advanced Scheduling in Kubernetes” but allow me to summarize: You can “taint” a node in your Kubernetes cluster so that the scheduling engine will avoid using that node unless your pod specifically has a “tolerance” for that taint. One common use case is that of GPU based processing. You taint the GPU nodes so that only the CUDA capable pods have the tolerance flag to use it — that way the CPU/Memory isn’t absorbed by pods that could run on non-specialty nodes.
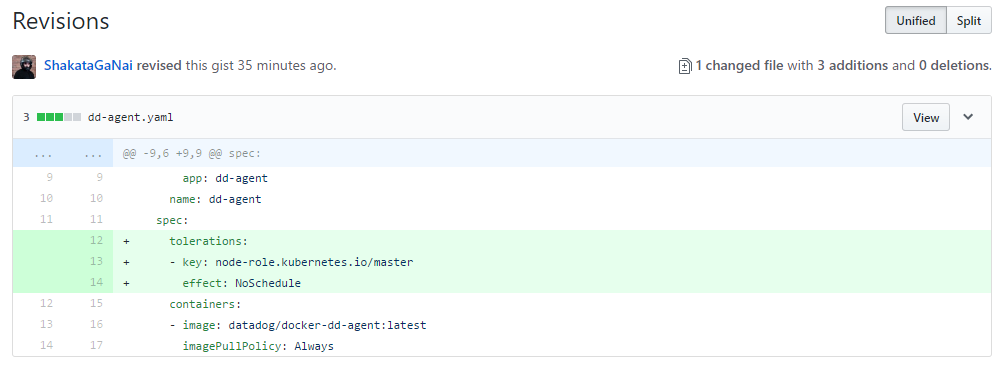
Why is this important to us? As of version 1.6 the Kubernetes master are in most ways, regular members of of the cluster. However, they have been made special with the taint of “node-role.kubernetes.io/master:NoSchedule“. In the Datadog example I was working with, it’s just a 3 line change to their YAML, to get the agent deployed on ALL nodes of the Kubernetes cluster (not just the workers). Below is a full copy of the up-to-date YAML file which only requires the modification of the ‘API_KEY‘ to properly used.
Keep in mind, this trick will work with any type of daemonset. If you have other infrastructure support pieces that you’d like to run on all your cluster nodes, such as monitoring, data storage or log collection; the same few lines will get you going.